10 Essential Tips for Building Your Own Die Filer
If you’re a hobbyist or a machinist frequently filing small metal parts, a die filer can revolutionise your workflow. Instead of manually pushing a file back and forth, this clever machine does the reciprocating motion for you, leaving you free to concentrate on precision. Since commercial die filers are rare and expensive, building your own is a rewarding project. Here are ten crucial things you need to know before you start, based on a successful home-built design.
1. Understand the Core Mechanism
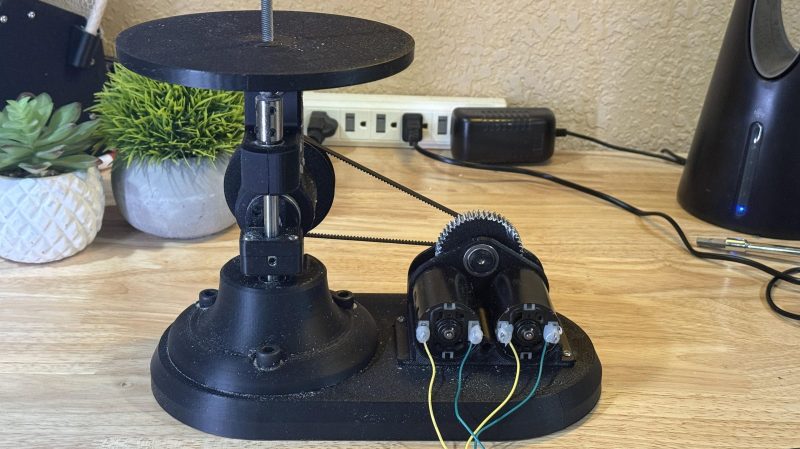
The heart of a die filer is a simple but effective mechanism that converts rotational motion into vertical reciprocating motion. A rotating shaft connects to a crank, which drives a pin that slides within a slotted carrier. This carrier is attached to a linear bearing, so as the wheel turns, the pin pushes the carrier and attached rod up and down. Attach a file to that rod, and you have a working die filer. Understanding this slotted-link arrangement is critical because it determines stroke length and smoothness.

2. Choose the Right Motor Configuration
In the build we’re examining, two DC brushed motors work in tandem to provide the driving power. While a single motor could suffice, using two allows for redundancy and balanced torque delivery. DC brushed motors are affordable and easy to control with simple electronics. They also offer good torque at low speeds, which is essential for filing operations. Consider the mounting arrangement carefully to ensure proper alignment with the gearbox.
3. Gear Down for Torque and Speed Control
Raw motor speed is far too high for safe, controlled filing. Therefore, a reduction stage is mandatory. Here, a gearbox steps down the output from the motors, and a short belt drive provides additional reduction. This dual reduction not only increases torque but also allows you to fine-tune the final speed. Aim for a stroke rate between 100 and 300 cycles per minute for most filing tasks. Use a speed controller to adjust on the fly.
4. Use a Linear Bearing for Smooth Motion
The reciprocating rod must move with minimal friction and wobble. A linear bearing is the ideal component here. It supports the rod both radially and axially, ensuring the file moves in a true vertical line. Without it, the file could flex or bind, leading to inaccurate filing and premature wear. When selecting a linear bearing, choose one with a sealed design to keep out metal dust and debris.
5. Master the Slotted Carrier and Crank Pin
The slotted carrier (or scotch yoke) is the key to converting rotation to reciprocation. The crank pin runs in a slot machined into the carrier. As the crank rotates, the pin slides back and forth in the slot, causing the carrier to move up and down without rotating. This design is simple but requires precise alignment: the slot must be perpendicular to the direction of motion. A slight misalignment will cause binding or excessive wear.
6. Select an Off-the-Shelf Speed Controller
Speed variation is crucial because different materials and file types require different stroke rates. Rather than designing a complex variable-speed system, an off-the-shelf PWM (pulse-width modulation) controller works perfectly. Such controllers are cheap, widely available, and easy to wire. They allow you to dial in the exact speed needed for roughing vs. finishing cuts. Mount the controller in a convenient location for easy adjustment while working.
7. Design a Sturdy Frame to Reduce Vibration
A die filer vibrates during operation, especially at higher speeds. Your frame must be rigid to prevent these vibrations from affecting accuracy. Use thick steel plate or aluminium for the base and uprights. Welded construction is better than bolted joints, though bolted is acceptable if you add locking compounds. Consider adding rubber feet or a vibration-damping mat underneath to isolate the machine from your workbench.
8. Incorporate a File Holder That’s Easy to Swap
The file must be firmly attached to the reciprocating rod but also quickly removable for changing files. A simple collet or a clamp-style holder works well. Drill the rod and use a setscrew to pinch the file tang, or design a quick-release mechanism. Ensure the holder does not introduce any play; otherwise, the file may chatter during use. A tool-less swap system will save time when moving from coarse to fine files.
9. Add Safety Guards and Emergency Stop
Any reciprocating machine poses a pinching hazard. Install a transparent polycarbonate shield around the reciprocating linkage to prevent fingers or clothing from being caught. Also, include a prominent emergency stop button that cuts power to the motor controller immediately. The button should be easily reachable from the working position. Safety should never be an afterthought in a DIY tool build.
10. Test with Scrap Material Before Final Use
Before you start filing your prized project parts, run the die filer on scrap metal to verify alignment, stroke length, and speed range. Check for excessive noise or binding. Make small adjustments to the belt tension and crank position until the motion is smooth and consistent. This final tuning phase is essential to get the most out of your homemade die filer and ensure it performs as well as commercial units.
Building your own die filer from scratch is a satisfying project that can save money and give you a tool tailored to your needs. By following these ten tips—from understanding the core mechanism to adding safety features—you’ll create a machine that makes precision filing faster and more enjoyable. Share your own build experiences and tips with the maker community; there’s always room to innovate. Happy filing!
Related Articles
- Inside the Web of Deceit: Key 'Scattered Spider' Member Admits Guilt
- Bitcoin's Role in Military Power Projection: Insights from the U.S. Indo-Pacific Command
- DDoS Protection Provider's Infrastructure Hijacked to Target Brazilian ISPs
- Safeguarding Linux Against the Copy Fail Vulnerability: A Step-by-Step Guide
- AI's Hidden Cost: How Surging Hard Drive Prices Threaten the Internet Archive
- How Frontier AI Is Redefining Cybersecurity for the Modern Era
- Canonical Faces Coordinated Cyberattack: Ubuntu Services Disrupted
- British Cybercriminal 'Tylerb' Admits Role in Scattered Spider's Sophisticated Phishing and Crypto Thefts